Essential Climbing Gear Checklist for Your First Outdoor Route

James Whitfield
24 June 2026
Essential Climbing Gear Checklist for Your First Outdoor Route
So you’ve been crushing it at the gym — sending V4s on the bouldering wall, confidently leading 5.10s on plastic, and belaying with your eyes closed (okay, please don’t actually do that). Now you’re ready for the real thing: outdoor rock climbing. But before you lace up your shoes and head to the crag, there’s one critical question you need to answer: Do you have the right gear?
Transitioning from indoor climbing to outdoor rock is one of the most exhilarating steps in a climber’s journey. It’s also one of the most gear-intensive. Unlike the gym, where everything is bolted, color-coded, and conveniently provided, outdoor climbing demands that you bring your own safety systems — and understand every single piece of equipment you carry.
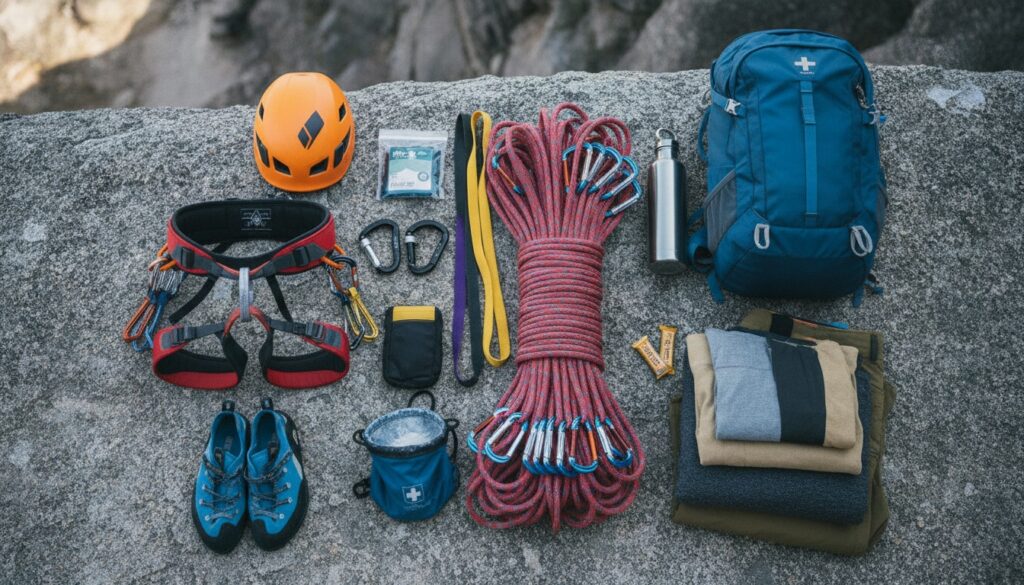
In this comprehensive guide, we’ll walk through every essential piece of climbing gear you need for your first outdoor sport climbing route. Whether you’re planning a single-pitch outing at your local crag or gearing up for a weekend road trip to Red River Gorge, this checklist will ensure you show up prepared, confident, and safe.
Section 1: The Big Three — Harness, Helmet, and Shoes
These are the foundational pieces of your climbing kit. You likely already own climbing shoes and a harness from your gym days, but outdoor climbing places different demands on your equipment.
Climbing Harness
Your harness is your lifeline — literally. For outdoor sport climbing, look for a harness that offers:
- Comfortable padding for longer routes and hanging belays
- Adjustable leg loops to accommodate layering in cooler weather
- Gear loops (at least four) for racking quickdraws, slings, and other equipment
- A sturdy belay loop rated to at least 15 kN
- Lightweight (under 300g is ideal)
- Well-ventilated for warm-weather climbing
- UIAA or CE certified for climbing-specific impact protection
- Comfortable with adjustable fit systems
- Diameter: Thicker ropes (10mm+) are more durable and easier to handle for beginners. Thinner ropes (9.5mm) are lighter but wear faster.
- Length: Check the route descriptions at your crag. Many modern sport routes require a 70-meter rope to safely lower from the anchors. A 60-meter rope may leave you short on longer pitches.
- Dry treatment: If you’ll be climbing in damp conditions, a dry-treated rope resists moisture absorption and lasts longer.
- Middle mark: A visible middle mark helps you know when you’re halfway through your rope — essential for safe lowering.
- Tubular devices (e.g., Black Diamond ATC, Petzl Verso) — Simple, lightweight, and versatile. They require active braking from the belayer.
- Assisted-braking devices (e.g., Petzl GriGri, Mammut Smart, Edelrid Mega Jul) — These provide a mechanical camming or pinching action that helps lock the rope in the event of a fall.
- Always pair your belay device with a locking carabiner (HMS/pear-shaped for tubular devices)
- Practice with your device before heading outdoors
- Never rely solely on the device — always maintain a proper brake hand position
- How many? Count the bolts on your route and add two extra for the anchor. Most single-pitch sport routes require 10 to 14 quickdraws.
- Gate type: Quickdraws with a straight gate on the bolt side and a bent or wire gate on the rope side are the most user-friendly.
- Length: Standard quickdraws (12cm dogbone) work for most situations. Bring a few longer draws (18–25cm) or alpine draws to reduce rope drag on wandering routes.
- Two 120cm nylon or Dyneema slings — useful for extending anchors, building equalized anchor systems, or slinging natural features
- A cordelette (5–6 meters of 7mm nylon cord or 6mm high-strength cord) — for building anchor equalization systems at the top of multi-bolt stations
- Personal anchor system (PAS) or daisy chain — for safely clipping into anchors while cleaning a route
- One for your personal anchor system
- Two for building or cleaning top anchors
- One spare (because you’ll always need one more)
- A chalk bag with a secure closure and a belt or clip attachment
- Loose chalk or a chalk ball — some crags have chalk restrictions, so check local ethics
- A chalk bucket is great for bouldering but less practical for roped climbing
- Adhesive bandages and climbing tape
- Antiseptic wipes
- Blister treatment (moleskin)
- Pain relievers (ibuprofen)
- Emergency whistle
- Space blanket
- Approach shoes — Sturdy, sticky-soled shoes for hiking to the base of the climb (La Sportiva TX3 or Five Ten Guide Tennie are classics)
- Rope bag or tarp — Keeps your rope clean, organized, and free from dirt that accelerates wear
- Headlamp — Routes sometimes take longer than expected. Don’t get caught in the dark.
- Sun protection — Sunscreen, sunglasses, and a hat. Rock reflects UV like a mirror.
- Water and snacks — Climbing is athletic. Stay hydrated and fueled.
- Guidebook or route app — Mountain Project, 27 Crags, or a printed guidebook for your area
- First purchase: Harness, helmet, shoes, belay device, locking carabiner, chalk bag
- Second purchase: Rope, rope bag, personal anchor system
- Third purchase: Quickdraws (full set of 12), extra locking carabiners, slings
- Fourth purchase: Approach shoes, first aid kit, headlamp, accessories
- [ ] Climbing harness
- [ ] Climbing helmet
- [ ] Climbing shoes
- [ ] Dynamic rope (60–70m)
- [ ] Belay device + locking carabiner
- [ ] Quickdraws (10–14)
- [ ] Locking carabiners (3–4 extra)
- [ ] Slings (2x 120cm)
- [ ] Cordelette or anchor-building material
- [ ] Personal anchor system
- [ ] Chalk bag + chalk
- [ ] Rope bag or tarp
- [ ] Approach shoes
- [ ] Headlamp
- [ ] First aid kit
- [ ] Sun protection
- [ ] Water + snacks
- [ ] Guidebook or route app
- [ ] Phone + emergency contact info
Pro Tip: Before heading outdoors, double-check your harness for signs of wear — frayed webbing, faded tie-in points, or stiff buckles. If your harness is more than five years old or has seen heavy use, it’s time for a replacement.
Climbing Helmet
Here’s the thing: you probably don’t wear a helmet at the gym. Outdoors, a helmet is non-negotiable. Loose rock, dropped gear from climbers above, and the possibility of an inverted fall all make head protection essential.
Look for helmets that are:
Climbing Shoes
Your gym shoes can work outdoors, but consider the type of rock you’ll be climbing. Granite slabs demand excellent smearing ability, while steep limestone pockets require a more aggressive, downturned shoe.
For your first outdoor routes, a moderately aggressive, all-around shoe is your best bet. The La Sportiva Tarantulace, Scarpa Origin, or Evolv Defy are excellent choices that perform well on a variety of rock types without destroying your feet on multi-pitch days.
Section 2: The Rope and Belay System
If the harness is your lifeline, the rope is the system that catches you. Choosing the right rope and belay device is critical for outdoor safety.
Dynamic Climbing Rope
For single-pitch sport climbing, you’ll want a single-rated dynamic rope in the range of 9.5mm to 10.2mm diameter and 60 to 70 meters in length. Here’s what to consider:
Safety Note: Never use a static rope for lead climbing or top-roping. Static ropes don’t stretch, which means a fall generates enormous force on your body, the anchors, and the rope itself. Dynamic ropes are specifically designed to absorb the energy of a fall.
Belay Device
There are two main categories of belay devices for sport climbing:
Section 3: Protection and Anchoring — Quickdraws, Slings, and Carabiners
Outdoor sport climbing routes are protected by bolts drilled into the rock. To clip into these bolts, you need quickdraws. To build or clean anchors, you’ll need additional slings and carabiners.
Quickdraws
A quickdraw consists of two carabiners connected by a short, sewn sling (dogbone). One carabiner clips to the bolt; the other clips to your rope.
Slings and Cordelette
Even on sport routes, it’s wise to carry:
Locking Carabiners
Bring at least three to four locking carabiners in addition to the one on your belay device:
Section 4: Safety Essentials and Personal Items
Beyond the core climbing hardware, several additional items can make the difference between a great day at the crag and a dangerous one.
Chalk and Chalk Bag
First Aid Kit
Outdoor climbing happens in remote settings where help may be far away. Pack a basic kit that includes:
Other Must-Haves
Don’t Forget: Always tell someone where you’re going and when you expect to return. Cell service at the crag is never guaranteed.
Section 5: Building Your Rack — Budget Tips and Buying Strategy
Let’s be honest: climbing gear is expensive. A full sport climbing rack can easily cost $800 to $1,500 or more. Here’s how to build your kit smartly without breaking the bank.
Prioritize Safety Over Savings
Never buy used ropes, harnesses, or helmets unless you know their complete history. Soft goods degrade over time and with UV exposure, and internal damage isn’t always visible. Hard goods like carabiners and belay devices can be safely purchased used if they show no signs of damage or excessive wear.
Buy in Stages
You don’t need everything at once. Here’s a suggested buying order:
Share the Load
Climbing is a partnership sport. Split shared gear costs with your climbing partner — one person buys the rope, the other buys the quickdraws. Many climbing communities also have gear swap events or online forums where you can find deals.
Look for Sales
End-of-season sales at retailers like REI, Backcountry, and Bergfreunde can save you 20–40% on premium gear. Sign up for newsletters and watch for holiday promotions.
The Complete Gear Checklist at a Glance
Here’s your quick-reference checklist to print and pack:
Conclusion: Gear Up, Get Out, Stay Safe
Your first outdoor climbing experience should be thrilling, not terrifying. Having the right gear — and knowing how to use it — is the foundation of a safe and enjoyable day on real rock. Every piece of equipment on this list serves a purpose, and skipping even one item can compromise your safety or cut your day short.
Remember: gear is only as good as the knowledge behind it. Before heading outdoors, take an outdoor climbing course, climb with experienced mentors, and practice your systems at ground level. Learn to check knots, inspect anchors, communicate clearly with your belayer, and manage risk.
The transition from gym to crag is one of the most rewarding milestones in climbing. The feel of real rock under your fingertips, the sound of wind through the trees, the satisfaction of clipping chains on a route that nature built — it’s an experience that no gym can replicate.
Ready to Make the Leap?
If you found this checklist helpful, bookmark it and share it with your climbing partner so you’re both on the same page. Have questions about specific gear recommendations for your local crag? Drop a comment below — our community of climbers loves helping newcomers get started on the right foot.
And if you’re looking for more in-depth guides on outdoor climbing techniques, anchor building, and route-finding, subscribe to our newsletter for weekly tips delivered straight to your inbox. Your next adventure starts with the right preparation — and you’re already taking the first step.
Climb smart. Climb safe. See you at the crag.